AI Configuration
Snippety allows you to configure the AI Assistant to generate content for your snippets.
It supports ChatGPT models from OpenAI and also allows you to configure a custom API to connect to your own AI model or a third-party provider.
OpenAI Integration
To use OpenAI models, you need to have an API key. You can get it by signing up on the OpenAI website.
Once your account is created, you can create a new API key in the API keys section.
Also, you need to top up your account with some credits to enable the API. You can do it in the Billing section.
Next, you need to configure the AI Assistant in Snippety by providing the API key in the settings.
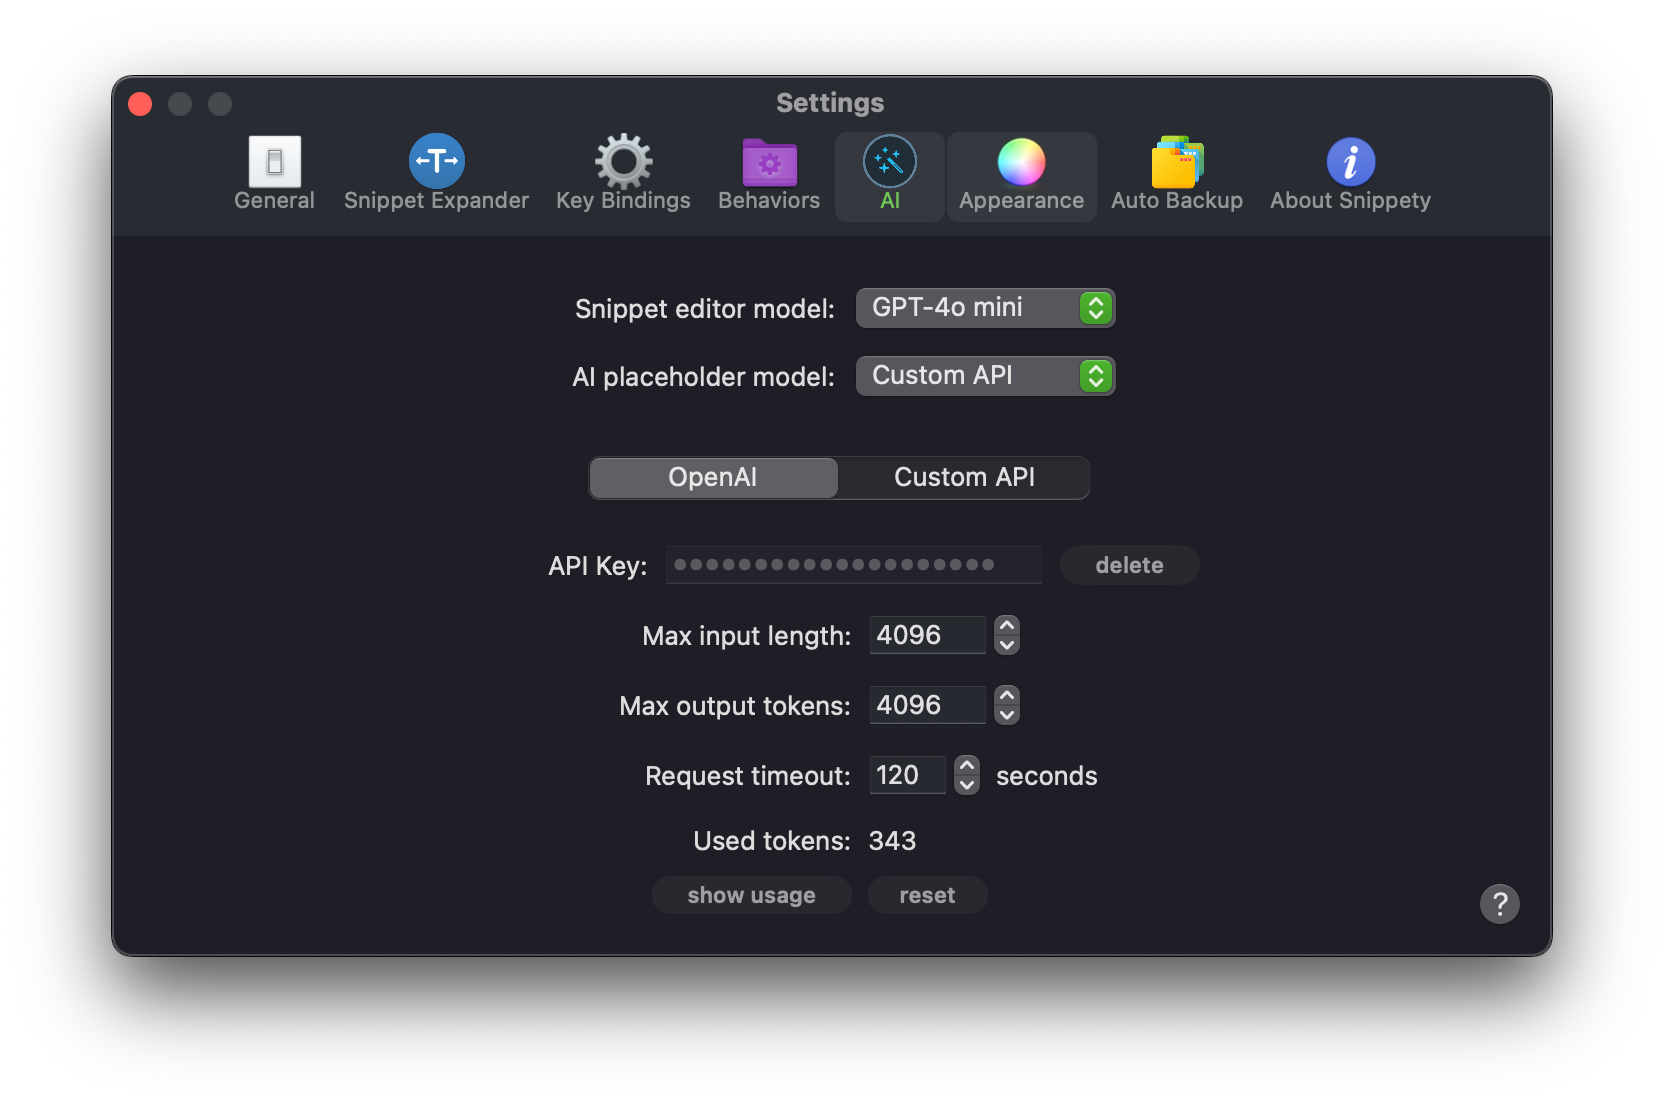
Models
Once the API key is set, you can choose the model you want to use in the
Snippety. In most cases, GPT-4o or GTP-4o mini should be sufficient.
Snippety allows to pick the model for the AI placeholder and the Snippet Editor.
-
AI placeholder model is used when you expand a snippet with the AI Assistant placeholder.
-
Snippet Editor model is used when you use the AI Assistant in the Snippet Editor.
Settings
In the settings, you can configure the following options:
-
API Key: The API key you got from the OpenAI website. It is required to use the API. The key is stored securely on your machine in the Keychain.
-
Max input length: The maximum length of the input text that will be sent to the AI model. If the input text is longer than this value, an error will be returned. This option is to prevent accidentally sending too much text to the model, which could result in a higher cost.
-
Max output tokens: The maximum number of tokens the AI model can consume while generating the content. This value must match the model's maximum token limit. Please refer to the OpenAI documentation for more information.
-
Request timeout: The maximum time in seconds to wait for the AI model to respond. If the model does not respond within this time, an error will be returned.
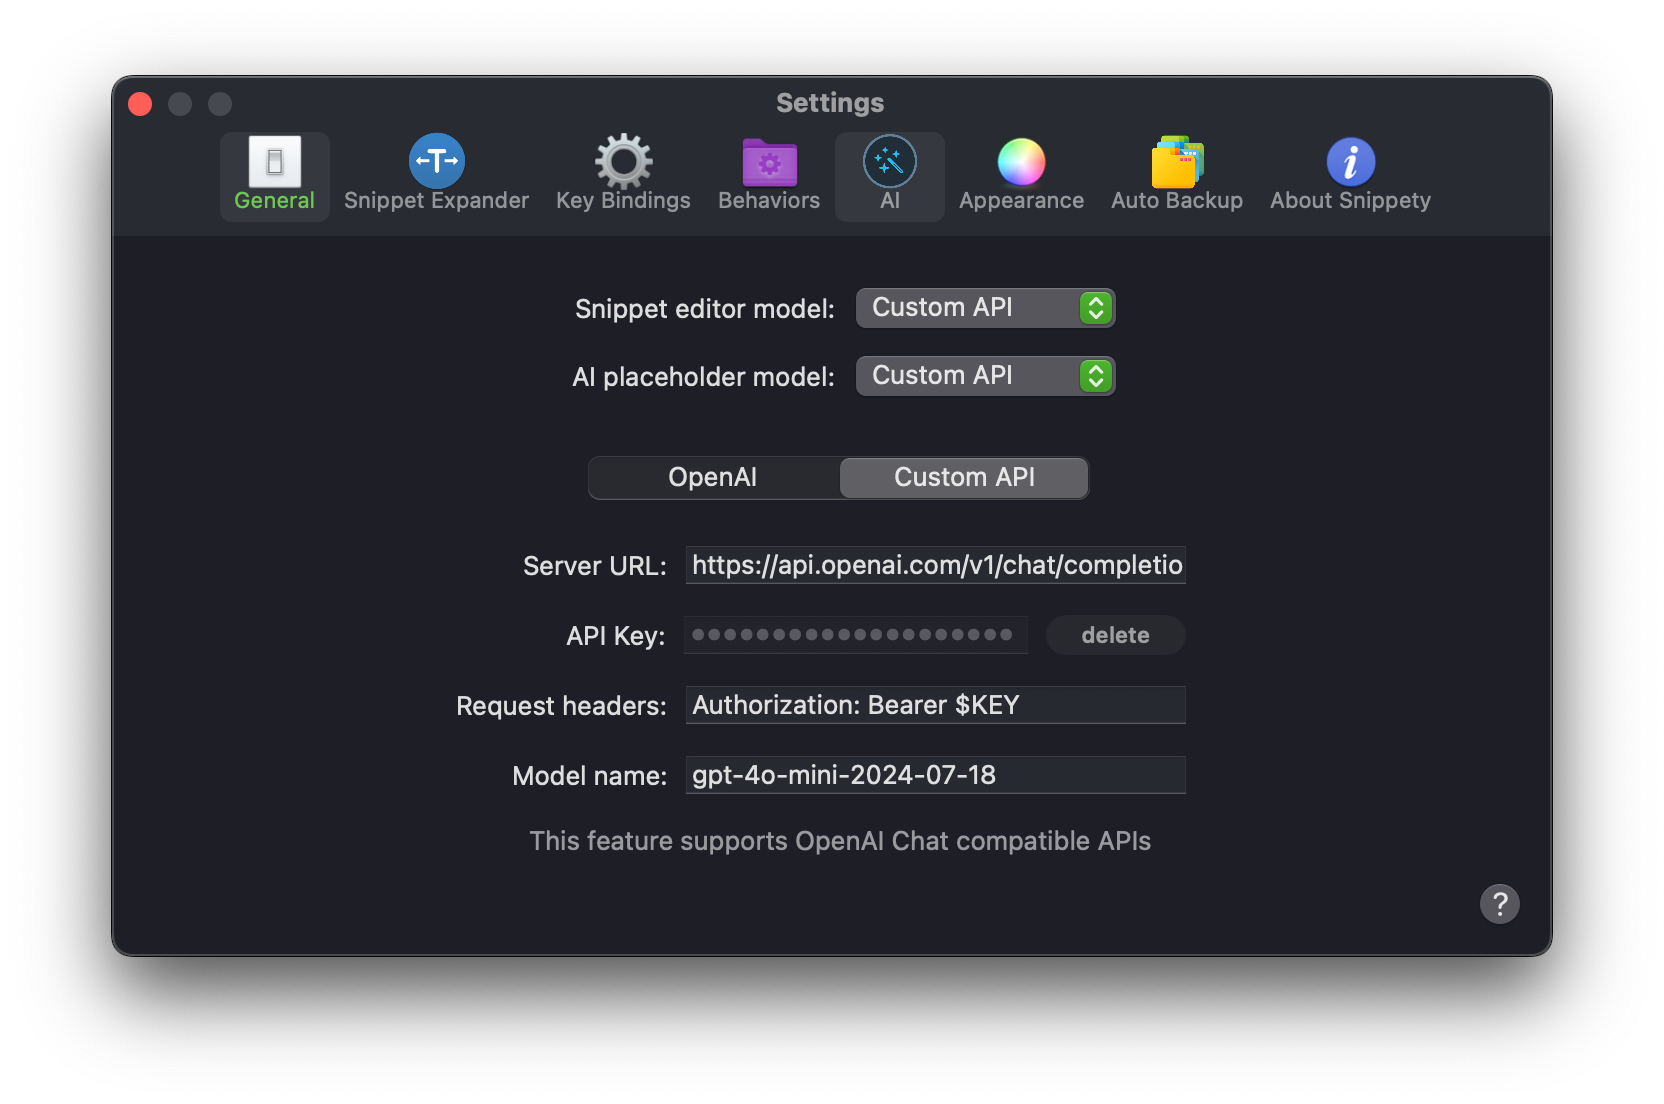
Custom API
Snippety allows you to connect to your own AI model via a custom API. You can self-host the model or use a third-party provider that is compatible with the OpenAI Chat API.

Settings
In the settings, you can configure the following options:
-
Server URL: The URL to your AI provider. It should be a valid URL that points to the API endpoint. The endpoint must be compatible with the OpenAI Chat API. This field is required. E.g.
http://localhost:11434/v1/chat/completions. -
API Key: The optional API key. If your provider requires an API key, you can provide it here. The key is stored securely on your machine in the Keychain. You can use it in headers and the URL by using
$KEYvariable. -
Request headers: Additional headers that will be sent with the request to the API. The headers should be in the format
key: value. You can use;to separate multiple headers. E.g.Authorization: Bearer $KEY; Platform: Snippety. -
Model name: The name of the model you want to use. It will be sent as a
modelJSON field in the request. This field is required. E.g.llama3.
Ollama Integration
Ollama.com app allows you to run local AI models and self-host them providing OpenAI compatible API.
You first need to install Ollama and download the model you want to use. Please refer to the Ollama repository for more information.
Next, you can start the Ollama server:
OLLAMA_HOST="http://0.0.0.0:11434" ollama serve
By providing OLLAMA_HOST environment variable, Ollama will listen on all
interfaces and you can access it from other devices in your network. You may
also need to add ollama binary to Firewall exceptions in macOS settings.
To find its path, you can run:
which ollama
Server URL
By default, Ollama runs on http://localhost:11434 and you can use it as a server URL in Snippety:
http://localhost:11434/v1/chat/completions
Model Name
Model name depends on the model you downloaded. You can find names by running:
ollama list
E.g. llama3.
Using Ollama On Other Devices
If you configured everything correctly, you should be able to connect to the Ollama server from Snippety both on macOS and iOS within the same network.
Just check your IP address and use it in the server URL on other devices
instead of localhost.
Other Providers
You can use other AI providers that are compatible OpenAI Chat API the same way as Ollama. Just provide the server URL and model name. Optionally, you can also provide the API key and headers if required.
Custom OpenAI Model
Let's see another example of how to use a custom OpenAI model without using the built-in OpenAI integration.
-
Set Server URL from the documentation:
https://api.openai.com/v1/chat/completions -
Set your generated API key.
-
Set Request headers to include the
Authorizationheader:Authorization: Bearer $KEY -
Set Model name to the model you want to use, e.g.
gpt-4o-mini-2024-07-18.
As you can see, it is straightforward to use custom AI providers in Snippety.
Custom API Interface
Below you can find the interface for the custom API that Snippety expects. You can use it to provide your own API that will work with Snippety.
Request
Snippety sends a POST request to the AI model using the provided Server URL with the following JSON body:
{
  "model": "<model name from settings>",
  "messages": [
    {
      "role": "system",
      "content": "<instructions>"
    },
    {
      "content": "<instructions>",
      "role": "user"
    },
    {
      "role": "assistant",
      "content": "<sample response>"
    },
    {
      "content": "Instructions: <your text>",
      "role": "user"
    }
  ],
  "temperature": 1,
  "presence_penalty": 0,
  "top_p": 1,
  "frequency_penalty": 0
}
Response
Snippety expects a JSON response with the following structure:
{
  "choices": [
    {
      "message": {
        "role": "assistant",
        "content": "<response>"
      }
    }
  ]
}
The first choice is used from the response. Additional fields are ignored.